Deploy your Seaside app in 10 mins for free using Amazon EC2
Amazon’s offer of a free micro instance for a year grabbed my attention:
To help new AWS customers get started in the cloud, AWS is introducing a new free usage tier. Beginning November 1, new AWS customers will be able to run a free Amazon EC2 Micro Instance for a year…
But would a micro instance be sufficient to allow a Seaside application to run within Gemstone (my deployment method of choice, who also offer a free licence)? The answer is YES and my experiments have resulted in a pre-configured Gemstone EC2 Linux AMI (Amazon Machine Image). In this post I describe how to use this pre-configured image to rapidly deploy Seaside applications for free on EC2.
Note: These instructions are based on connecting from a MacOS client to an Amazon EC2 instance; they should be relevant for other Unix clients. For a Windows client you’ll probably need to download either or both of:
and modify the instructions accordingly.
Creating an EC2 instance
Head over to http://aws.amazon.com and sign-up. Once signed-in you’ll be able to navigate to the dashboard screen:
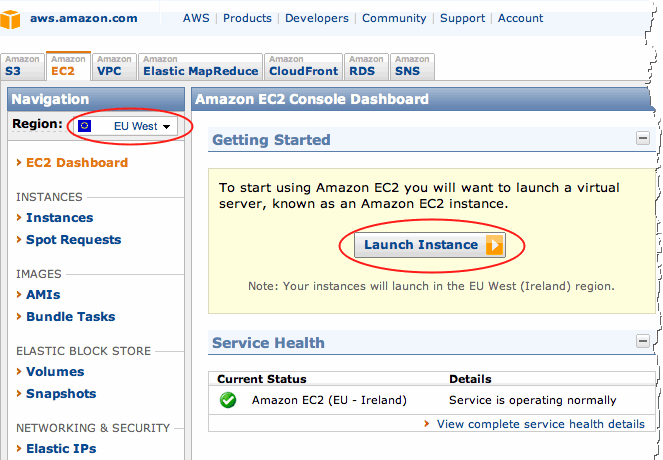
- From the region drop-down, choose the region closest to you.
- Click the ‘Launch Instance’ button to open the ‘Request Instance Wizard’
Select the ‘Community AMI’ tab and enter the AMI ID (Amazon Machine Image) of your region in the search box:
- EU-WEST
ami-7f9bae0b - US-EAST
ami-603bcb09
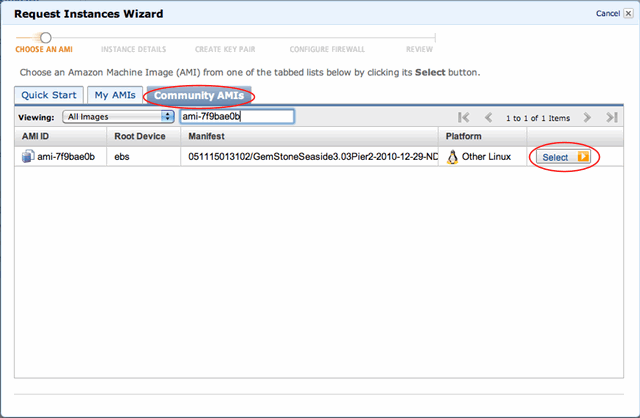
Note: After recording the screen-cast, I realised that each region is autonomous and Amazon currently (Jan 2011) doesn’t make it easy to copy AMIs between regions. I’ve copied the EU-WEST AMI to US-EAST region. If there’s a huge demand for a US-WEST AMI or Asia Pacific AMI, let me know and I’ll do my best to create one there as well.
The configuration of this AMI is described in a previous post.
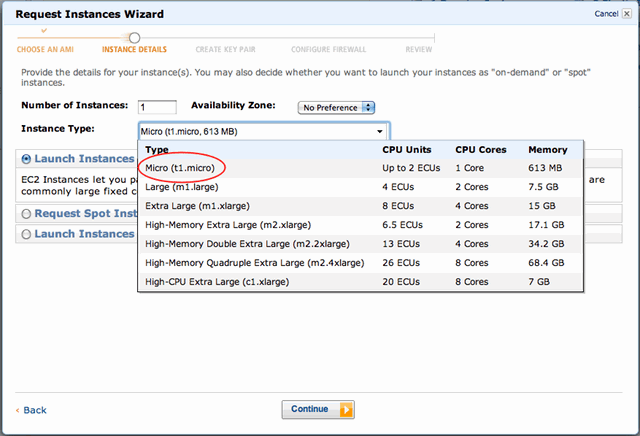
Select the ‘micro instance’ if you want to take up Amazon on their free offer. Amazon describes micro instances as:
Instances of this family provide a small amount of consistent CPU resources and allow you to burst CPU capacity when additional cycles are available. They are well suited for lower throughput applications and web sites that consume significant compute cycles periodically.
Next we pass an RSA public key to the EC2 instance which will allow SSH access. The key is generated using ssh-keygen:
$ ssh-keygen -t rsa
Generating public/private rsa key pair.
Enter file in which to save the key (/Users/nickager/.ssh/id_rsa):
Enter passphrase (empty for no passphrase):
Enter same passphrase again:
Your identification has been saved in /Users/nickager/.ssh/id_rsa.
Your public key has been saved in /Users/nickager/.ssh/id_rsa.pub.
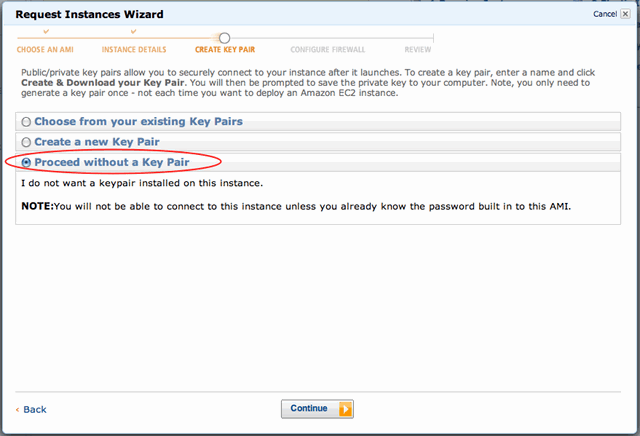
Then grab your public key from ~/.ssh/id_rsa.pub and pass it to the instance in the user data field in the following format:
#cloud-config
ssh_authorized_keys:
  - ssh-rsa AAAAB3NzaC1y........
disable_ec2_metadata: true
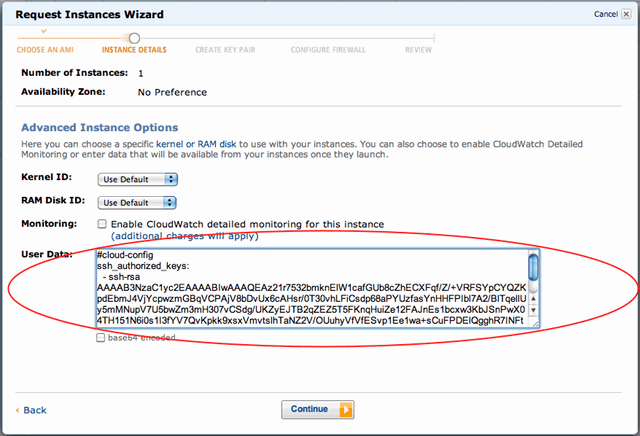
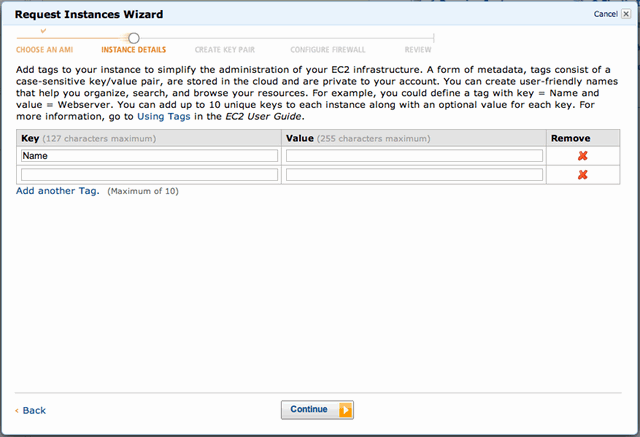
No need to pass any key/value pairs:
As we’ve passed an SSH key in the user data step above, there’s no need to specify a key pair:
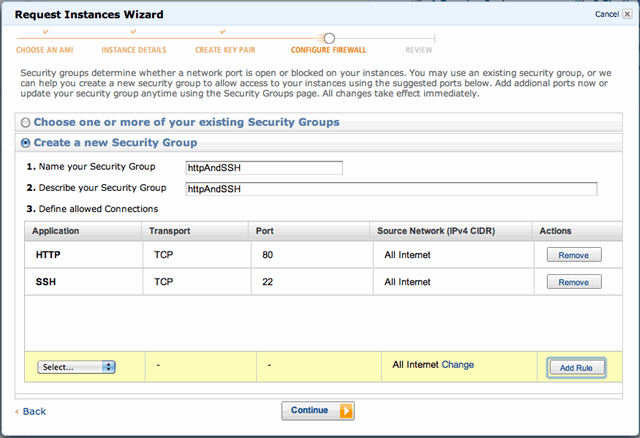
Configure the firewall by opening port 25 (SSH) and port 80 (HTTP):
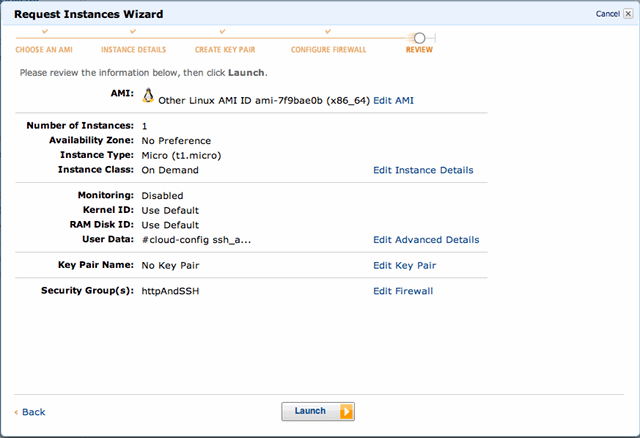
Finally launch and wait for the instance to boot:
Once the instance is booted, copy the instance URL (public DNS):
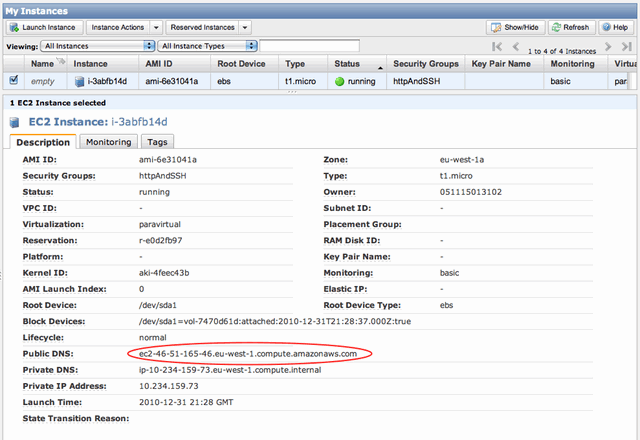
Point your browser at the public DNS address of your server, eg http://ec2-46-51-165-46.eu-west-1.compute.amazonaws.com and you should see the familar Seaside welcome screen:
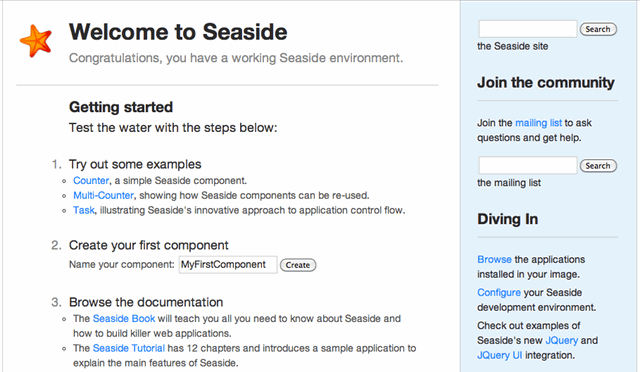
Congratulations you have your own free Seaside server running in Amazon EC2.
About the configuration
You should find that the counter, task and ‘create a component’ samples work as expected, however /browse, /config and links to the JQuery samples will result in 403 (unauthorised) and 404 (not found) errors. Also notice the absence of the bottom Seaside toolbar. This is by design to harden the environment – as your instance is now live on the Internet. The following sections show how to load your own code into your remote instance and how to access /config.
As well as the welcome screen, there is a default installation of Pier available at /pier. Pier is a powerful and flexible content management system built on Seaside and as it includes a blog it’s ideal for sites such as this one.
Accessing /config
Use the public DNS address to ssh into the newly created instance, with the user seasideuser:
ssh -L 8888:127.0.0.1:80 seasideuser@ec2-46-51-165-46.eu-west-1.compute.amazonaws.com
You should see something similar to:
$ ssh -L 8888:127.0.0.1:80 seasideuser@ec2-46-51-165-46.eu-west-1.compute.amazonaws.com
The authenticity of host 'ec2-46-51-165-46.eu-west-1.compute.amazonaws.com (79.125.98.212)' can't be established.
RSA key fingerprint is de:96:12:b7:d0:9e:63:69:37:5a:4b:08:20:68:45:b6.
Are you sure you want to continue connecting (yes/no)?yes
Warning: Permanently added 'ec2-46-51-165-46.eu-west-1.compute.amazonaws.com,79.125.74.150' (RSA) to the list of known hosts.
Last login: Wed Dec 29 18:25:11 2010 from 93-96-148-251.zone4.bethere.co.uk


       __|  __|_  )  Amazon Linux AMI
       _|  (     /     Beta
      ___|___|\___|

See /etc/image-release-notes for latest release notes. :-)
[seasideuser@ip-10-234-159-73 ~]$
Now you should be able to browse to http://localhost:8888/config and access the configuration.
The -L 8888:127.0.0.1:80 parameter forwards localhost on the server to localhost:8888 on your client and the webserver is configured to only allow access to /config from localhost.
There’s also a logging screen which again is configured to only allow access through localhost; browse to /tools/objectlog (username: ‘admin’, password: ‘tool’)
Loading your own code into your Gemstone instance
If you’re still logged into your remote instance, first exit the instance and then ssh back in with the following command line:
$ ssh -X -C seasideuser@ec2-46-51-165-46.eu-west-1.compute.amazonaws.com
which should result in something similar to:
$ ssh -X -C seasideuser@ec2-46-51-165-46.eu-west-1.compute.amazonaws.com
Warning: untrusted X11 forwarding setup failed: xauth key data not generated
Warning: No xauth data; using fake authentication data for X11 forwarding.

       __|  __|_  )  Amazon Linux AMI
       _|  (     /     Beta
      ___|___|\___|

See /etc/image-release-notes for latest release notes. :-)
[seasideuser@ip-10-234-159-73 ~]$
The -X parameter enables X11-forwarding, -C compression. This enables you to open GemTools on your remote instance, but have X11 forward the window to your local computer’s display.
GemTools is a Pharo environment which allows you to connect to Gemstone, load and modify code, and perform administrative activities from a GUI environment (such as starting and stopping servers, backing-up and restoring the database etc).
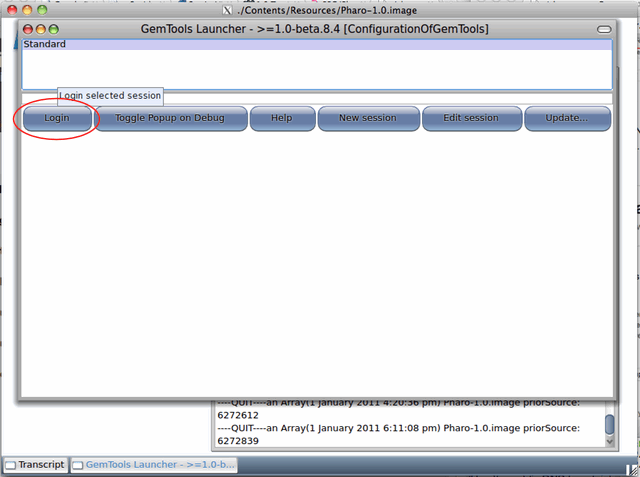
Start Gemtools:
$ ~/gemtools.sh
and press the ‘Login’ button to connect to the Gemstone server which is running in your instance:
You should now be logged into your Gemstone server:
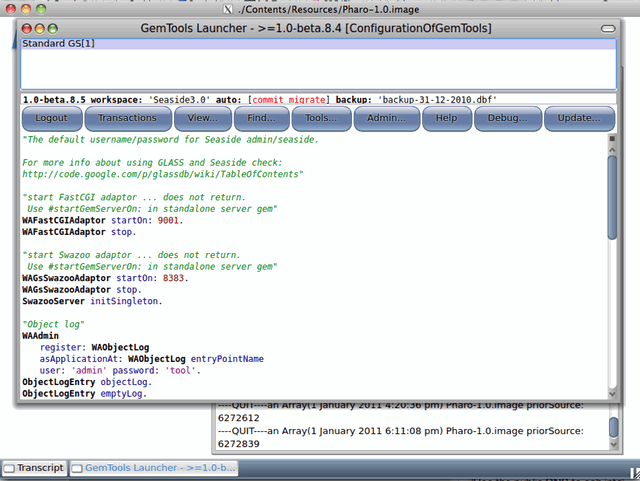
Now you can use the Monticello to load your code into your remote instance. Click on the ‘Tools’ button and select Monticello. Add the repository containing your code and load as normal. You can also use Metacello and Gofer to load code.
Using GemTools
Although you can work productively inside GemTools, as it’s running remotely in your instance, you’ll probably find it more productive to work locally either within a Pharo image, using the VMWare GLASS virtual appliance, or by installing Gemstone on your local machine.
If you’re connecting from a MacOS client, you may find it useful to map the Ctrl and CMD keys see: MacOS And X11.
Improvements
- I’ve yet to configure any monitoring software.
- There’s nothing to restart Gems if they crash.
- There’s no scheduled backup of the database occurring.
- I’ve made no attempt to configure a mailserver.
The [Glass Daemon Tools documentation])http://code.google.com/p/glassdb/wiki/GLASSDaemonTools) shows one route to implement some of these improvements.
Feel free to use this configuration as the basis for your own improved configuration, then share that configuration back with the community. Creating and sharing a modified configuration is relatively straight-forward.
Making your instance more secure
Here are three ways in which you can make your installation more secure (this is not an exhaustive list):
- keep your system software up-to-date
- require a password to use
sudo - change the SSH port.
1. Keep your system software up-to-date
Periodically run:
sudo yum update
2. Require a sudo password
First you need to set a password for seasideuser:
$ passwd
Changing password for user seasideuser.
New password:
Then edit /etc/sudoers:
sudo vim /etc/sudoers
change the line:
seasideuser ALL = NOPASSWD: ALL
to read:
seasideuser ALL = (ALL) ALL
you will now need a password when executing a command using sudo.
3. Change the SSH port
The default SSH port is port 22, many attacks target this port. That said, the only way to ssh into this instance is via RSA keys. Additionally root access is disabled (a common attack route). However if you want to be extra cautious you might want to change the ssh port (although I doubt this provides any protection against a determined attack).
First you should open the new port on your firewall. Select ‘Security Groups’ from within the Amazon AWS EC2 tab then select the security group associated with your instance. Add the new port.
Next edit /etc/ssh/sshd_config
sudo vim /etc/ssh/sshd_config
and change the line which reads:
Port 22
to your new port, say 20001:
Port 20001
restart the ssh daemon:
sudo /etc/init.d/sshd restart
next exit your instance and log-back in using your new port:
ssh -p 20001 seasideuser@ec2-46-51-165-46.eu-west-1.compute.amazonaws.com
Finally you can re-edit your firewall (‘Security Group’) to remove access to port 22.
Further information
The configuration of this instance is documented in a previous post; Installing Gemstone on an Amazon EC2 Linux instance
There’s lots of great Gemstone documentation available:
- Glass wiki
- Gemstone manuals
- James Foster’s blog
- Dale Henrick’s blog