Installing Gemstone on an Amazon EC2 Linux instance
This entry describes how to install and configure Gemstone on an Amazon EC2 Linux instance to create an EC2 deployment target for a Seaside application.
Note: These instructions are based on connecting from a MacOS client to an Amazon EC2 instance; they should be relevant for other Unix clients. For a Windows client you’ll probably need to download either or both of:
and modify the instructions accordingly.
Creating an EC2 instance
Head over to http://aws.amazon.com and sign-up. Once signed-in you’ll be able to navigate to the dashboard screen:
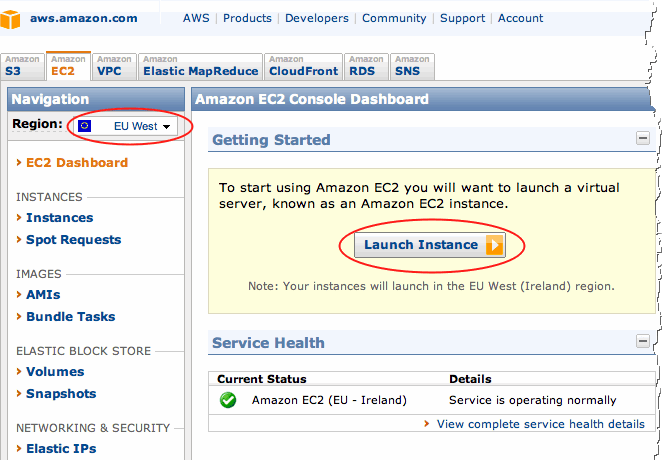
- From the region drop-down, choose the region closest to you.
- Click the ‘‘Launch Instance’’ button to open the ‘‘Request Instance Wizard’’
Gemstone requires a 64bit OS; select the 64bit Amazon Linux instance:
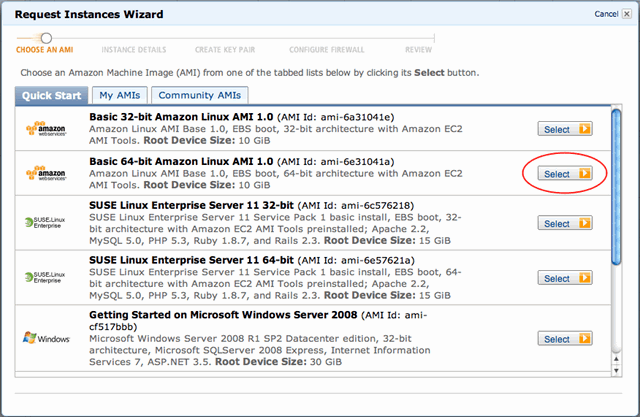
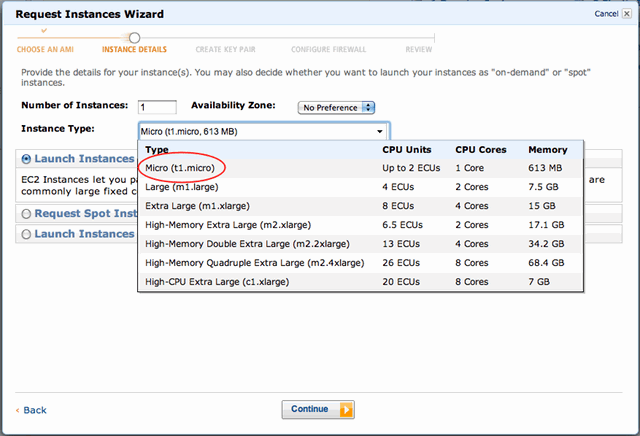
Select the micro instance if you want to take up Amazon on their free offer. Amazon describes micro instances as:
Instances of this family provide a small amount of consistent CPU resources and allow you to burst CPU capacity when additional cycles are available. They are well suited for lower throughput applications and web sites that consume significant compute cycles periodically.
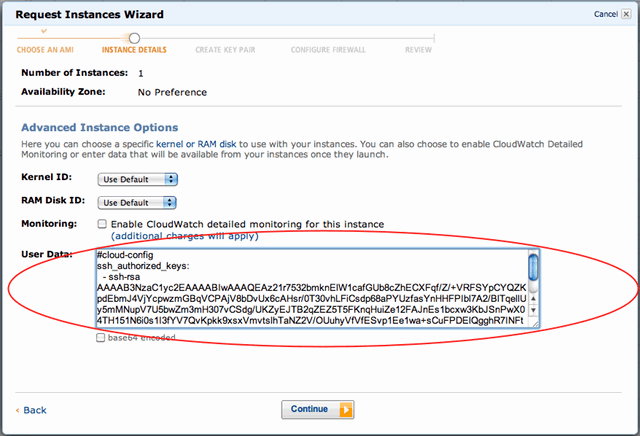
Next we pass an RSA public key to the EC2 instance which will allow SSH access. The key is generated using ssh-keygen:
$ ssh-keygen -t rsa
Generating public/private rsa key pair.
Enter file in which to save the key (/Users/nickager/.ssh/id_rsa):
Enter passphrase (empty for no passphrase):
Enter same passphrase again:
Your identification has been saved in /Users/nickager/.ssh/id_rsa.
Your public key has been saved in /Users/nickager/.ssh/id_rsa.pub.
Then grab your public key from ~/.ssh/id_rsa.pub and pass it to the instance in the user data field in the following format:
#cloud-config
ssh_authorized_keys:
  - ssh-rsa AAAAB3NzaC1y........
disable_ec2_metadata: true
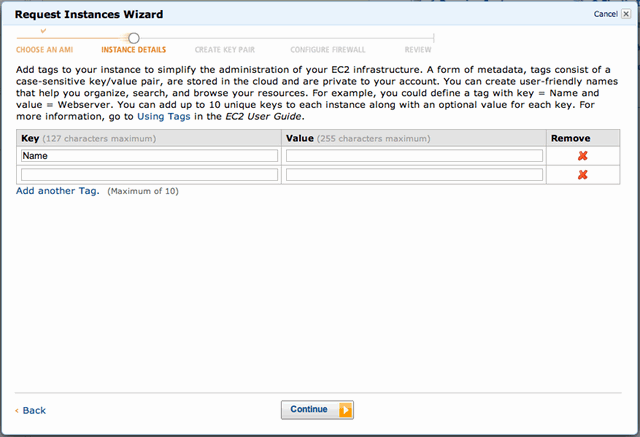
No need to pass any key/value pairs:
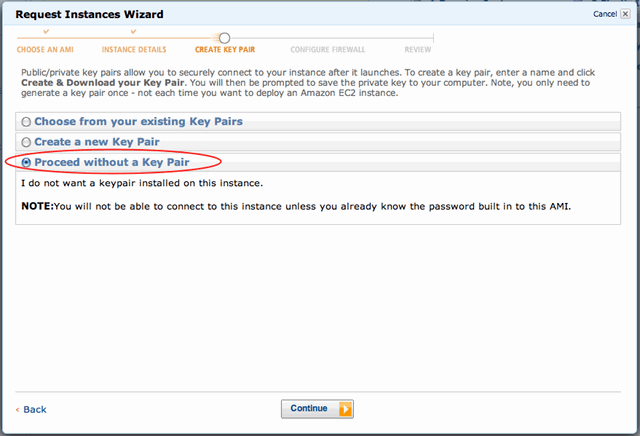
As we’ve passed an SSH key in the user data step above, there’s no need to specify a key pair:
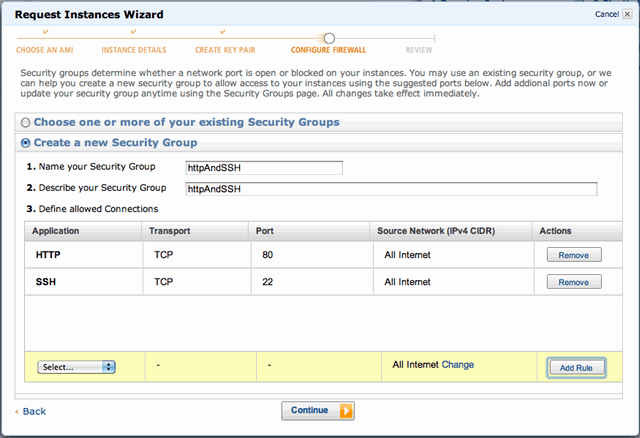
Configure the firewall by opening port 22 (SSH) and port 80 (HTTP):
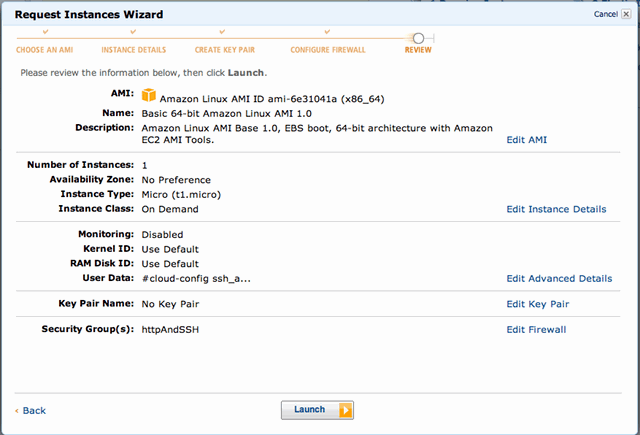
Finally launch and wait for the instance to boot:
Once the instance is booted, copy the public DNS of your new instance:
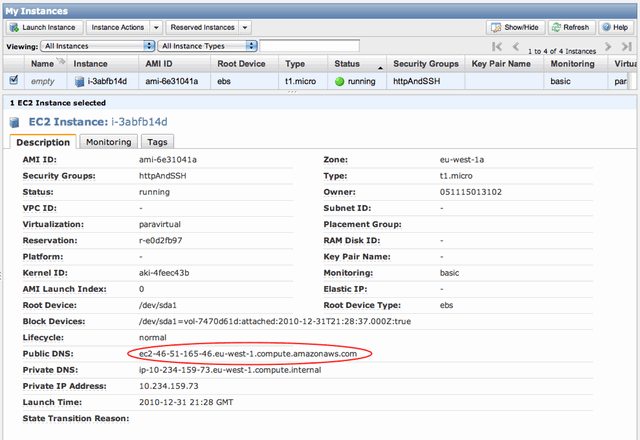
Use the public DNS to ssh into the newly created instance, with the user ec2-user:
$ ssh **ec2-user**@ec2-46-51-165-46.eu-west-1.compute.amazonaws.com

       __|  __|_  )  Amazon Linux AMI
       _|  (     /     Beta
      ___|___|\___|

See /etc/image-release-notes for latest release notes. :-)
[ec2-user@ip-10-234-159-73 ~]$
Configure the Instance
Create a new user:
sudo adduser seasideuser
sudo passwd -d seasideuser
Then edit /etc/sudoers:
sudo vim /etc/sudoers
and add:
seasideuser ALL = NOPASSWD: ALL
login as the new user:
su - seasideuser
again edit /etc/sudoers and this time remove references to ec2-user
edit /etc/ssh/sshd_config:
sudo vim /etc/ssh/sshd_config
and modify the following lines as:
#PermitRootLogin forced-commands-only
#UsePAM yes
AllowUsers seasideuser
Now copy the ssh key file:
mkdir ~/.ssh
sudo cp /home/ec2-user/.ssh/authorized_keys ~/.ssh/
sudo chown seasideuser ~/.ssh/authorized_keys
sudo chgrp seasideuser ~/.ssh/authorized_keys
chmod 700 ~/.ssh/
chmod 600 ~/.ssh/authorized_keys
restart the ssh daemon:
sudo /etc/init.d/sshd restart
Now logout:
exit
..and log back-in as seasideuser:
ssh **seasideruser**@ec2-46-51-165-46.eu-west-1.compute.amazonaws.com
delete the default ec2-user:
sudo userdel ec2-user
sudo rm -rf /home/ec2-user/
Install Gemstone
cd
wget http://seaside.gemstone.com/scripts/installGemstone.sh
chmod +x installGemstone.sh
./installGemstone.sh
setup the Gemstone environment by editing .bash_profile
vim .bash_profile
add the following line:
source /opt/gemstone/product/seaside/defSeaside
install the new key file:
cd /opt/gemstone/product/seaside/etc
wget http://seaside.gemstone.com/etc/gemstone.key-GLASS-Linux-2CPU.txt
mv gemstone.key gemstone.key.orginal
mv gemstone.key-GLASS-Linux-2CPU.txt gemstone.key
check /opt/gemstone/product/seaside/bin/startSeaside30_Adaptor the end of which should read:
run
GemToGemAnnouncement uninstallStaticHandler.
System beginTransaction.
(ObjectLogEntry
 fatal: '$1: topaz exit'
 object:
   'port: ', $2 printString, ' ',

   'pid: ', (System gemVersionReport at: 'processId') printString) addToLog.
System commitTransaction.
%
remove the installation downloads:
rm ~/*
logout and login and check the environment:
set | grep gem
test your Gemstone installation:
startGemstone
Creating system startup scripts for Gemstone
The following /etc/init.d/gemstone script is based a template. It seems to work, but I’m sure can be improved.
sudo vim /etc/init.d/gemstone
#!/bin/bash
#
# chkconfig: 345 86 14
# description: Gemstone server
#

# Get function from functions library
. /etc/init.d/functions

# Gemstone specific definitions

RUNASUSER="seasideuser"
GEMSTONE_BIN="/opt/gemstone/product/seaside/bin"
GEMSTONE_STOPNET="/opt/gemstone/product/bin"

# Start GemStone
startGemStone() {
        logger "Starting GemStone server: "
        daemon --user=$RUNASUSER $GEMSTONE_BIN/startGemstone
        daemon --user=$RUNASUSER $GEMSTONE_BIN/startnet
        success $" GemStone server startup"
        echo
}


# Start the Gems
startGems() {
        logger "Starting the Gems: "
        daemon --user=$RUNASUSER "$GEMSTONE_BIN/runSeasideGems30 start WAFastCGIAdaptor \"9001 9002 9003\""
        success $" Gems started"
        echo
}

# Stop GemStone
stopGemStone() {
        logger "Stopping GemStone server: "
        daemon --user=$RUNASUSER $GEMSTONE_STOPNET/stopnetldi
        daemon --user=$RUNASUSER $GEMSTONE_BIN/stopGemstone
        echo
}

stopGems() {
        logger "Stopping the Gems: "
        daemon --user=$RUNASUSER "$GEMSTONE_BIN/runSeasideGems30 stop WAFastCGIAdaptor \"9001 9002 9003\""
        echo
}

start() {
        startGemStone
        startGems
}

stop() {
        stopGems
        stopGemStone
}

### main logic ###
case "$1" in
  start)
        start
        ;;
  stop)
        stop
        ;;
  restart|reload|condrestart)
        stop
        start
        ;;
  *)
        echo $"Usage: $0 {start|stop|restart|reload}"
        exit 1
esac

exit 0
Make the startup script executable:
sudo chmod +x /etc/init.d/gemstone
sudo chkconfig --add gemstone
Check the startup script has been installed:
sudo chkconfig --list
you should see gemstone listed as:
gemstone 0:off 1:off 2:off 3:on 4:on 5:on 6:off<
Adding Gemstone background service task
Now to install the ServiceVM, which is described as:
The Service VM example is intended to provide example code for creating and using a separate “Service VM” for offloading work that in a Squeak/Pharo Seaside application, you would have forked of a thread to do the work.
The prototypical example would be to obtain a token from an external web-service (i.e., sending an HTTP request to obtain a token or other data). You would not want to defer the response to the user in this case, especially if the request can take several minutes to complete (or fail as the case may be).
cd /opt/gemstone/product/seaside/bin
create /opt/gemstone/product/seaside/bin/startServiceVM30 by copying the contents of: http://code.google.com/p/glassdb/wiki/ServiceVMExampleStartServiceVM30Script
set script as executable:
chmod +x startServiceVM30
modify /opt/gemstone/product/seaside/bin/runSeasideGems30 to match http://code.google.com/p/glassdb/wiki/ServiceVMExampleRunSeasideGems30Script
Test your Gemstone installation
sudo /etc/init.d/gemstone restart
Configuring a webserver
A variety of webservers have been used with Gemstone:
I’ve chosen Nginx as it’s a popular, fast, scalable server. It also supports https reverse proxy, allowing server code to access https resources even though Gemstone doesn’t support https directly.
Configuring Nginx
Install Nginx:
sudo yum install nginx
then configure /etc/nginx/nginx.conf as:
#######################################################################
#
# This is the main Nginx configuration file.
#
# More information about the configuration options is available on
#   * the English wiki - http://wiki.nginx.org/Main
#   * the Russian documentation - http://sysoev.ru/nginx/
#
#######################################################################

#----------------------------------------------------------------------
# Main Module - directives that cover basic functionality
#
#   http://wiki.nginx.org/NginxHttpMainModule
#
#----------------------------------------------------------------------

user seasideuser seasideuser;
worker_processes  1;

error_log  /var/log/nginx/error.log;
#error_log  /var/log/nginx/error.log  notice;
#error_log  /var/log/nginx/error.log  info;

pid        /var/run/nginx.pid;


#----------------------------------------------------------------------
# Events Module
#
#   http://wiki.nginx.org/NginxHttpEventsModule
#
#----------------------------------------------------------------------

events {
    worker_connections  1024;
}


#----------------------------------------------------------------------
# HTTP Core Module
#
#   http://wiki.nginx.org/NginxHttpCoreModule
#
#----------------------------------------------------------------------

http {
    include       /etc/nginx/mime.types;
    default_type  application/octet-stream;

    log_format  main  '$remote_addr - $remote_user [$time_local] "$request" '
                      '$status $body_bytes_sent "$http_referer" '
                      '"$http_user_agent" "$http_x_forwarded_for"';

    access_log  /var/log/nginx/access.log  main;
    sendfile        on;
    keepalive_timeout  65;

    tcp_nodelay        on;
    client_max_body_size 10m;
    gzip  on;
    gzip_buffers 4 8k;
    gzip_types text/plain text/css application/json application/x-javascript text/xml application/xml application/xml+rss text/javascript;
    gzip_disable "MSIE [1-6]\.(?!.*SV1)";

    upstream seaside {
       server 127.0.0.1:9001;
       server 127.0.0.1:9002;
       server 127.0.0.1:9003;
    }

    server {
        listen       80;
        server_name  _;
        root /var/www;

        location / {
            try_files $uri @seaside;
        }

       location @seaside {
          include /etc/nginx/fastcgi_params;
          fastcgi_intercept_errors on;
          fastcgi_pass seaside;
       }

       location /config {
         allow 127.0.0.1;
         deny all;
         try_files $uri @seaside;
       }

       location /tools {
         allow 127.0.0.1;
         deny all;
         try_files $uri @seaside;
       }

       error_page 404 /errors/404.html;
       error_page 403 /errors/403.html;
       error_page 500 502 503 504 /errors/50x.html;

    }

    # example using a reserve proxy for https to external service
    server {
      server_name paypaltesting;

      location / {
         proxy_pass https://svcs.sandbox.paypal.com;
        }
    }
}
Create the directories which will be used for serving static files:
cd /var
sudo mkdir www
sudo chown seasideuser:seasideuser www
cd www
mkdir errors
cd errors
create error pages: 404.html 403.html and 50x.html.
create the log directory:
cd /var/log
sudo mkdir nginx
sudo chown seasideuser:seasideuser nginx
Restart Nginx:
sudo /etc/init.d/nginx restart
About the Nginx configuration
Nginx proxies requests to Gemstone, with three Gems listening on ports 9001, 9002 and 9003 to FastCGI requests from the Nginx.
The lines:
location / {
            try_files $uri @seaside;
        }
instruct the webserver to fulfill a request by first attempting to serve a file from the file-system, if no file is found then the request is forwarded to Gemstone.
The lines:
location /config {
         allow 127.0.0.1;
         deny all;
         try_files $uri @seaside;
       }

       location /tools {
         allow 127.0.0.1;
         deny all;
         try_files $uri @seaside;
       }
ensure that /config and /tools are not visible to world; they are only visible from localhost (see later).
See also: Sean Allen’s Nginx configuration documentation
Configuring GemTools
GemTools is a Pharo environment which allows you to connect to Gemstone, load and modify code, and perform administrative activities from a GUI environment (such as starting and stopping servers, backing-up and restoring the database etc). This section borrows heavily from Ramon Leon’s blog post: ‘Faster Remote Gemstone’
Download and unpack the GemTools distribution:
wget http://seaside.gemstone.com/squeak/GemTools-1.0-beta.8-244x.app.zip
unzip GemTools-1.0-beta.8-244x.app.zip
rm __MACOSX -rf
rm GemTools-1.0-beta.8-244x.app.zip
Install 32bit support libraries:
sudo yum install xauth mesa-libGL.i686 libXrender.i686 libSM.i686 freetype.i686 libstdc++.i686
Create a helper script:
vim ~/gemtools.sh
#! /bin/bash
cd ~/GemTools-1.0-beta.8-244x.app
./GemTools.sh &
chmod +x gemtools.sh
Logout and log back in with:
ssh -X -C -L 8888:127.0.0.1:80 seasideruser@ec2-46-51-165-46.eu-west-1.compute.amazonaws.com
The -X parameter enables X11-forwarding, -C compression, -L 8888:127.0.0.1:80 forwards localhost on the server to localhost:8888 on your client enabling access to http://localhost:8888/config and http://localhost:8888/tools
start GemTools with:
~/gemtools.sh
GemTools should then launch within an X11-window on your desktop:
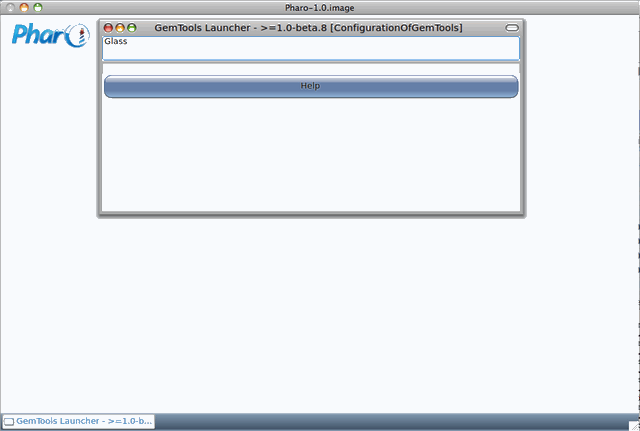
Open a standard Workspace in the GemTools image and execute the following script:
| hostname |
hostname := 'localhost'.
OGLauncherNode addSessionWithDescription:
    (OGStandardSessionDescription new
    name: 'Standard';
    stoneHost: hostname;
    stoneName: 'seaside';
    gemHost: hostname;
    netLDI: '50377';
    userId: 'DataCurator';
    password: 'swordfish';
    backupDirectory: '';
    yourself).
The GemTools launcher doesn’t automatically refresh with the new configuration. To force a refresh, close the launcher and open a new launcher by executing OGLauncher open in a Workspace
Now with ‘Standard’ highlighted in the top pane, connect to Gemstone with the Login button:
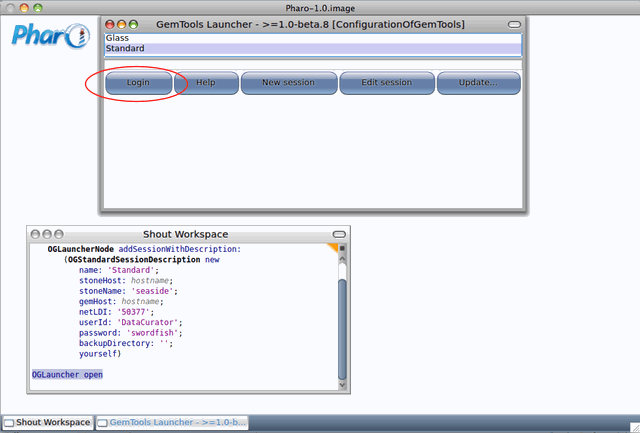
See GemTools Launcher Guide for more information.
Before loading Seaside you should update both GemTools and GLASS versions using the ‘‘Update’’ button on the launcher. See GemToolsUpdate wiki entry.
Load the latest Seaside and Pier into Gemstone
Before loading any code ensure the menu option under ‘Admin->Commit on Almost out of memory’ is selected, also open a Transcript window open. Then in a GemTools workspace execute the following:
Gofer project load: 'Seaside30' group: 'ALL'.
Gofer project load: 'Pier2'.
Gofer project load: 'PierAddOns2' group: 'ALL'.
Once Seaside is loaded, configure the Gemstone FastCGI adaptor and the three serving Gems, by executing the following script, in the GemTools workspace:
WAGemStoneRunSeasideGems default
	name: 'FastCGI';
	adaptorClass: WAFastCGIAdaptor;
	ports: #(9001 9002 9003).
WAGemStoneRunSeasideGems restartGems.
Test all the moving parts
Point your browser at the public DNS address of your server, eg http://ec2-46-51-165-46.eu-west-1.compute.amazonaws.com and you should see the familar Seaside welcome screen:
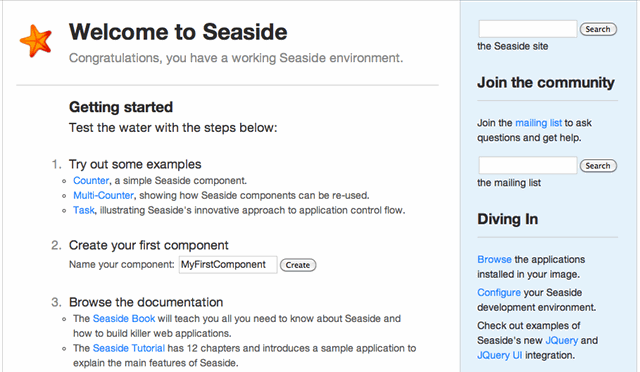
Improvements
- I’ve yet to configure any monitoring software.
- There’s nothing to restart Gems if they crash.
- There’s no scheduled backup of the database occurring.
The Glass Daemon Tools documentation shows one route to implement these improvements.
All suggestions for improvements welcome.
Acknowledgements and References
- Glass wiki, specifically BuildYourOwnGLASSAppliance
- Ramon Leon’s blog specifically Installing a Gemstone Seaside Server on Ubuntu 10.10 and Faster Remote Gemstone
- James Foster’s blog article Setting up GLASS on Slicehost
- Sean Allan’s blog specifically Using FastCGI with Nginx and Seaside and Reverse Proxying to Seaside with Nginx
- Norbert Hartl’s blog post: Easy remote gemstone